If you want to restore an old cabinet or refinish a new one, you’ll need to start by scraping the old finish off and smoothing out the surface. Sanding down your cabinet can be a tedious and tiring project, especially if you try to do it by hand or with the wrong tool.
Orbital sanders are the quickest and most energy-efficient way to get the sanding out of the way and leave your cabinet’s surface slick and ready for that last coat of shine. Their circular pattern of movement does a miraculous job of evening out irregular surfaces without too much elbow grease from you.
Here’s a guide to the tools and techniques you’ll need for the sanding phase of cabinet restoration. We’ll give you some tips and tricks for prepping your surface, then finish by telling you how to finish them with a flourish.
What Is an Orbital Sander?
There are many different kinds of orbital sanders with different sizes, speeds, orbits, and configurations. What sets orbital sanders apart from sheet sanders is that the sanding pad underneath is shaped like a disc rather than a square or rectangle.
Orbital sanders generally spin at around 10,000 RPM. Some orbital sanders spin in a fixed circular motion. Others both spin and wiggle at the same, creating a random orbital motion that offsets the center by around an eighth of an inch. These are called random orbital sanders.
A random orbital sander is the best sander for finishing work where a fine touch is needed. For rough work where previous finishes or other kinds of residue need to be removed, the best orbital sander to use is one with a regular circular pattern.
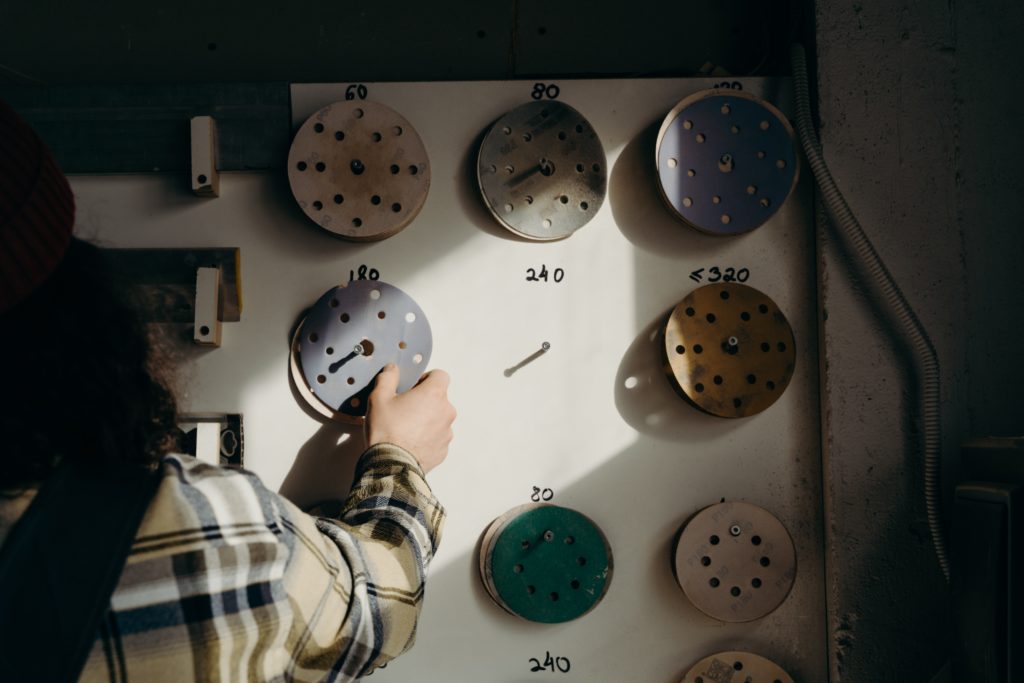
Where most sheet sanders use about a quarter of a sheet of regular sandpaper as their abrasive, orbital sanders use distinctive disc-shaped sandpaper. These usually attach to the sander via glue or Velcro and cost a little more than normal sandpaper. Most orbital sanders use discs measuring 5″ or 6″ in diameter. Heavy-duty orbital sanders may use discs with diameters of up to 8″ or 9″.
Some kinds of orbital sanders come with holes in the head that vacuum up the sawdust as you sand. Some sander models come with their own hole punchers, but you may have to buy sandpaper discs with holes.
- POWERFUL - With a 2.8 amp motor and 13,000 orbits per minute, it's able to deliver a smooth performance over a variety of sanding applications.
- EASY TO CLEAN DUST CONTAINER - The X-flow dust collector uses cyclone force to collect dust in it's easy-to-empty transparent container.
- SPEED CONTROL - Variable speed control provides the right amount of power and control across different materials.
- LOW VIBRATION - Through its ergonomic design and a soft rubber grip your hand stays comfortable while counterweight balance reduces hand fatigue from vibration. All so that you can work longer.
- SAND IN TIGHT PLACES - With a compact size and ergonomic design This sander can get into tight spaces easily and maximizes user control.
Different Cabinets Require Different Techniques
If your cabinet is made from solid wood or medium-density fiberboard (MDF), your orbital sander will work wonders. If your cabinet is made from laminate, you won’t be able to sand it without ruining the composite layer that acts as its skin. Even though laminate looks like wood, it’s basically the hot dog of wood, containing a mixture of wood and non-wood core materials.
If your cabinet has been stained, sealed, or painted, you’ll have to start by removing those layers. You can sand right through most thinner finish layers with the right sandpaper grit. Thicker finishes and most paints are better removed with a sturdy paint stripper.
What Kind of Sandpaper Grit Works Best?
Sandpaper comes in different grits, so make sure you use the right one for the job. The grit number lets you know how coarse the sandpaper is. Finer sandpapers have higher grit numbers, and coarser sandpapers have numbers on the lower end. Low-grit sandpapers are peppered with bigger abrasive specks, which sand things down faster and more roughly. High-grit sandpapers give you a more polished surface.
If your cabinet has an old finish or a light coat of paint that you want to remove, sandpaper with a coarse grit around 100 or 120 is rough enough to scratch off the outer layer quickly. When the outer layer rubs off, you can use finer sandpaper, like 180, for the main job and 220 for a smooth final round.
- Use it by hand, on a sanding block, or cut it to size for a power tool sander
- Aluminum oxide mineral
- Sands paint, wood, or metal
- Tough and durable
- 5/Pack
- It is 180 Grit
- The sandpaper is clog resistant
- Proven reduced hang fatigue
- The purple abrasive will not discolor the surface you are sanding.
- General purpose sandpaper
- Aluminum oxide mineral
- Sands paint, wood, or metal
- Follow the grain of the wood when sanding
- Skip no more than one grit in sanding sequence
Tools and Materials You’ll Need for Your Cabinet Restoration
Take a few minutes to gather the tools and materials you’ll need for the restoration process. This includes equipment for sanding, finishing, and personal protection.
Sanding Materials
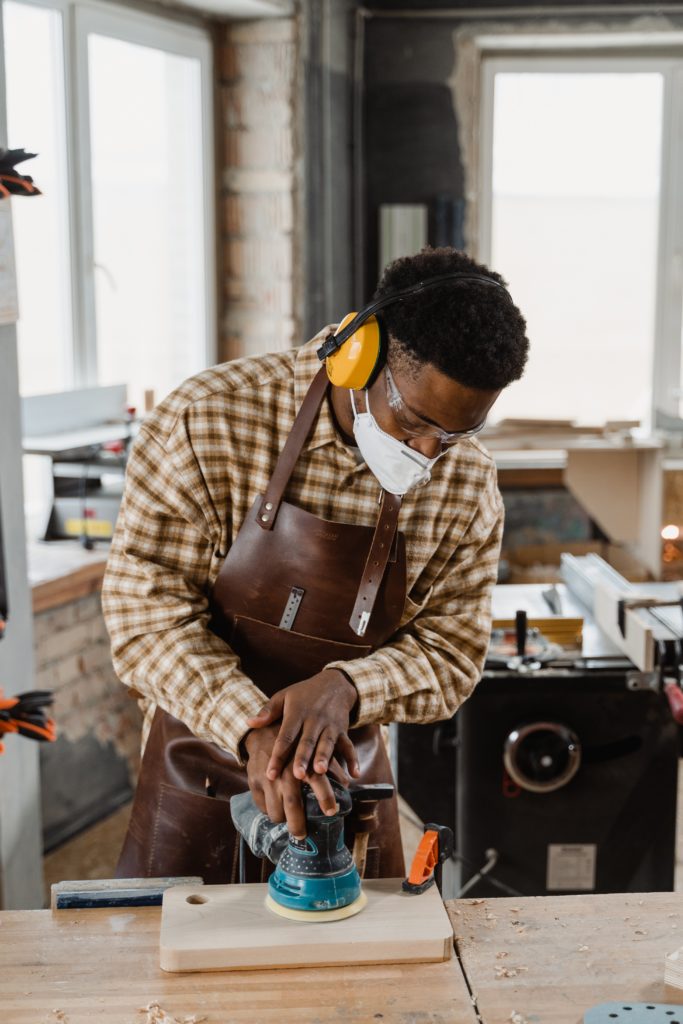
- Orbital sander – You’ll do most of the work with your orbital sander, so the more powerful it is, the easier the job will be. You may want to use a heavy-duty DeWalt or Makita for the first few rounds, then pivot to a smaller model or sand by hand for the finishing touches.
- Sandpaper – Have a few grits on hand for different parts of the job: 100, 120, 180, and 220 should be enough. Make sure the sandpaper fits your orbital sander.
- Vacuum – Sanding your cabinet will produce quite a bit of sawdust, so cleaning up will be a lot easier if you have a dust extraction vacuum nearby.
- POWERFUL PERFORMANCE: 6.0 Peak HP and 12-gallon drum ideal for projects in the garage, on the jobsite, home renovations or floods
- DUAL-FLEX TECHNOLOGY: 2-1/2 in. diameter shop vacuum hose features Dual-Flex technology for 180-degree mobility at each end to resist kinking
- BUILT-IN BLOWER PORT: Rear blowing port on this wet/dry vac allows for quick cleaning of leaves and grass clippings in your garage and outdoors
- EXTRA-LONG POWER CORD: 20 ft. power cord provides reach for most chores and wraps neatly around ergonomic, carry handle for storage
- ACCESSORIES INCLUDED: 2-1/2 in. x 7 ft. POS-I-LOCK Dual-Flex Hose, 2 Extension Wands, Utility Nozzle, Car Nozzle, Wet Nozzle, Qwik Lock Filter and Dust Collection Bag
- Tack cloth – This sticky, lightweight cloth will come in handy for wiping off any fine sawdust left on your cabinet before applying your finish.
- Set consists of 6 pieces - individually wrapped and generously sized painters tack cloths, each piece is 18 x 36 inches, made of premium yellow / gold cotton cheesecloth.
- Wax and silicone free, these anti-static soft cloths have just the right amount of tack to collect dirt, lint, dust, contaminants, giving you an outstandingly smooth surface ready for final finish.
- Set of Tack cloth for sanding – suitable for all finishes
- Open cloth and scrunch lightly to wipe away gently dirt, lint, dust, sawdust, contaminants, surface defect particles or any sanding residue for best pro finishing results
- Perfect for use by both hobbyist and professional with tack cloth automotive and tack cloth woodworking needs. Use after applying wax and grease remover for a mirror finish in auto painting.
- Plastic sheet or tarp – You can make the cleanup as easy as possible by spreading plastic sheeting or a tarp over your work space to catch all the flying particles and droplets.
- FINISHED SIZE - The marked size is the exact finished size. When you choose your size, you will get the exact size tarps.
- DUSTPROOF & WATERPROOF - This tarp is designed to be dustproof and waterproof, making it ideal for outdoor use in harsh weather conditions.
- HEAT-SEALED & REINFORCED - The four sides of the tarp are heat-sealed and folded, with nylon ropes inside for reinforcement. There is no needle hole, and it will not crack easily.
- CONVENIENT TO USE - Our tarp has metal grommets every 36 inches, making it easy to use and secure. Additionally, the plastic corner reinforcements at the four corners of the tarp make it more sturdy and aesthetically pleasing.
- ECONOMICAL & VERSATILE - This tarp is a bit heavier than the 5 mil option and is recommended for temporary outdoor protection from the elements. It is great for covering construction materials and equipment, as well as for use as a ground cover or to cover livestock.
- Degreaser – A basic degreaser will help you remove any residue on the surface of your cabinet before you sand it. Tough grease comes off easily with a paint prep solution such as trisodium phosphate (TSP). Dishwashing liquid can also work in a pinch.
- PAINT REMOVING-SPECIFIC FORMULA: Specifically formulated for painters, Zenex Painters Punch Hand Cleaner effectively removes paints, urethanes, lacquers, enamels, sealers, primers, resins, putties, glues, and adhesives from skin. Its solvent-free composition makes it safe for repeated use.
- NATURAL WALNUT SHELL SCRUBBERS: Fortified with natural walnut shell abrasives, Painters Punch provides a deep clean that’s tough on paint and grime but gentle on the skin. This cleaner targets even the most stubborn residues without damaging the skin's surface.
- MOISTURIZING AND CONDITIONING: Beyond its powerful cleaning capabilities, this hand cleaner is enriched with emollients and skin conditioners that nourish the skin, preventing dryness, cracking, and chapping.
- DRAIN SAFE & NON-GREASY: Painters Punch is dye-free and does not contain petroleum distillates. This tough-on-paint, easy-on-hands cleaner leaves no greasy residue, allowing for comfortable, clean hands.
- SUPER CONCENTRATED FORMULA: Painters Punch's super-concentrated formula means a little goes a long way, providing maximum strength and performance, reducing product waste, and making it a cost-effective choice for high-use environments. Made in the USA.
Finishing Materials
- Brush, spray, or roller – Keep on hand whichever tool you’ll use to apply your finish.
- Paint Brush Set Includes 1 Ea of 1" Flat, 1-1/2" Angle, 2" Stubby Angle, 2" Flat & 2-1/2" Angle
- Paint Brushes For Interior Or Exterior Projects. Use Angle Sash Paint Brush For Cutting Crisp Lines.
- Professional Results On Walls, Trim, Cabinets, Doors, Fences, Decks, Touch Up, Arts And Crafts.
- Premium Quality Paint Brushes! No Cardboard Covers Come With This Set.
- The SRT filament blend holds more paint to save time, less streaks & premium finish on walls & trim.
- Paint stripper – If you need to remove a previous layer of finish from your cabinet, a paint stripper can make the job a bit easier. It pulls the finish from the wood surface and gathers it into clumps.
- CITRISTRIP Paint & Varnish Stripping & Removing Gel is easy to use.
- Stays wet and active for up to 24 hours allowing stripping of multiple layers in one step.
- Removes dried latex and oil-based paint, varnish, lacquer, polyurethane and shellac.
- Strips multiple layers from wood, metal and masonry surfaces.
- Contains no methylene chloride or NMP (N-Methylpyrrolidone).
- Putty knife – Once the old finish clumps up, you’ll need a putty knife to scrape off the residue.
- 【Multipurpose】5pcs Spackling Knives Different Sizes Are Available, Perfect For Putty, Wallpaper, Applique, Backing, Repair, Paint, Plaster, Including Drywall, Decals, Plaster, Baking, Spackling, Patching, Stucco And Much More, Can Be Used To Repair All Kinds Of Dents, Cracks, Holes, Spackle Tool Suitable For Any Work Project
- 【Will Not Corrode】Putty Knives Use of High-quality Stainless Steel Material, not Rust, Solid Corrosion Resistance, Easy To Clean, no Need To Worry About Deformation And Breakage. Is The Perfect Metal Scraper Tool
- 【Comfortable Grip】The Handle Part Is A Perfect Combination Of Soft Rubber And Plastic, Retains Sturdiness And Durability While Ensuring A Comfortable Grip. Also Designed With Holes For Easy Storage
- 【Family Essentials】What You Get: 1inch Putty Knife, 2inch Putty Knife, 3inch Putty Knife, 4inch Putty Knife, And 5inch Putty Knife; come With 5 Different Sizes Meet Your Different Using Requirements, can Be Used As Paint Scraper Tool, Wallpaper Remover, Drywall Knife Set And Most
- 【Customer Commitment】our Commitment to Rerdeim Has Always Been Committed To Providing Customers With Higher Quality Products And A Comfortable Customer Experience. If You Have Any Concerns Or Questions About This Product, Please Feel Free To Contact Us. We, Will, Get Back To You Within 72 Hours.
- Wood grain filler – If your cabinet is made of an open-grained wood like oak or mahogany, you may need to fill in the large pores for as smooth a surface as possible. Wood grain filler can flatten out any large holes, so you can apply your finish evenly.
- SPECIALLY FORMULATED FOR DEEPER PENETRATION - Our small particle size gel formula penetrates and seals the pores minimizing the absorption of your clear topcoat.
- IMPORTANT RECOMMENDATION - If painting, we recommend Aqua Coat WHITE Cabinet Grain Filler. It is higher solids with better visibility and adhesion making it perform better in less coats. This Clear formula is best when using Clear Coats vs Painting
- DESIGNED WITH EVERYONE IN MIND: From DIYers to contractors this is the perfect product to fill the grain and seal the pores of wood before or after staining or on raw wood to get a smooth finish on oak, ash, mahogany, walnut and other porous woods. A favorite product for tabletops, desktops, cabinets, vanities, millwork, pianos and guitars. For that glass smooth finish, start and finish all your hard to fill wood projects with Aqua Coat
- WATERBORNE AND ECO- FRIENDLY: Our entire line of products are MADE IN THE USA, low VOC, low odor, non-flammable, non-combustible, water-based fast drying, easy to apply, easy sanding, excellent adhesion, water clean up, environmentally friendly. This makes it the healthier option for your employees and your family. Achieve that beautiful glass smooth finish while keeping the environment and your health in mind.
- VERSATILE AND COMPATIBLE WITH OTHER PRODUCTS: Filling your wood grain before you stain not only creates that beautiful smooth finish you are looking to achieve it will also seal the pores and help minimize absorption of your top coat, saving you time and money. Aqua Coat Clear Grain Filler can be mixed with water soluble pigments/dyes.
- Wood putty – If you’re restoring an older cabinet full of dents and nicks, you can use wood putty to flatten out small imperfections before sanding.
- Gorilla All Purpose Wood Filler is the go-to product for strong, durable repairs on cracks, gouges and holes.
- The unique formula is easy to spread allowing for a smooth, natural finish.
- Its high performance stainability, paintability, and sandability provides you with a professional looking finished project.
- Shrink & Crack Resistant
- Interior/ Exterior; Water Resistant
- Mineral spirits or paint thinner – If the finish you plan to use is oil-based, keep a cup of mineral spirits or paint thinner nearby to clean your roller or brush.
Protective Equipment
Sanding fills the air around you with tiny particles. If you have to sand off a previous finish, those particles could include dangerous or hazardous chemicals. Working outside will give you plenty of fresh air, but you might not be able to keep the wind from blowing foreign particles all over your cabinet while you’re trying to work. If you work indoors, make sure your work space has plenty of ventilation, and don’t let your kids or pets hang around while you’re working.
Here are a few pieces of essential personal protective equipment (PPE) for cabinet restoration:
- Eye protection – A face shield or glasses can do the bare minimum to protect your eyes, but a pair of safety goggles with a good seal will do the most to keep dust out.
- Anti-Fog Wide-Vision Lab Safety Goggle,Eye Protection for Classroom Lab, Home, and Workplace Safety
- Safety Goggle Chemical Splash and Impact Resistant Goggle Clear Anti-Fog/Anti-Scratch Coating Protective Eyewear
- Polycarbonate lens: clear lens, good visual effect, splash-proof, effective UV blocking
- Soft edge design: the frame is made of lightweight PVC, soft and bendable, comfortable to wear, no pressure feeling
- Adjustable head belt: The elastic band design to facilitate the fastening of the head circumference. It has wide space and it's suitable for various head circumferences.
- Ear protection – Depending on your ears and the kind of orbital sander you use, you might want to keep a pair of earplugs or earmuffs close by in case your ears start ringing.
- ULTRA COMFORTABLE - Made with super low-pressure, slow release, Comfy Cush Comfort Foam. Their user preferred color is as easy on your eyes as they are on your ears
- ULTRA NOISE BLOCKERS – With a Noise Reduction Rating (NRR) of 33 decibels, these versatile, noise blocking earplugs are great for sleeping, studying, work, travel, concerts, relaxation, motorcycling, loud events, etc
- #1 BRAND FOR SNORING, SLEEPING AND TO PROTECT HEARING - Mack’s is the #1 doctor recommended brand of foam earplugs to protect hearing and to get a good night’s sleep when sleeping with a snoring spouse
- #1 BRAND USED BY DOCTORS - Mack’s is the #1 brand of foam earplugs personally used by doctors. Trust the brand that doctors trust
- MADE IN THE USA – Proudly made in the USA with safe, high performance, noise reducing foam. Satisfaction guaranteed. The plastic jar is safety-sealed and features a convenient flip-open top for easy dispensing
- Breathing protection – If you’re sanding a small unfinished cabinet, you’ll probably be able to keep your respiratory system safe with a dust mask. For larger cabinets and fancy chemical stains, varnishes, and paints, you might want to use a respirator. Make sure to use the right filter in your respirator, depending on the particles you need to keep out. You can keep simple sawdust at bay with a particulate filter. If you need to apply or remove paint thinner, an epoxy-based resin, or lacquer, use a cartridge or filter designed to keep out organic vapors.
- NIOSH-APPROVED N95 for at least 95 percent filtration efficiency against certain non-oil-based particles and aerosols
- 3M COOL FLOW EXHALATION VALVE helps direct exhaled air downward and allows for easy breathing
- UP TO 50% EASIER BREATHING. Compared to non-valved 3M 8200 Testing
- ADVANCED FILTER MEDIA for easy breathing
- ADJUSTABLE M-NOSECLIP helps provide a custom and secure seal
- Hand protection – Avoid sanding down your fingers or splashing chemicals on your hands by wearing a pair of work gloves. Even paints that don’t contain toxic chemicals can irritate or cause reactions to your skin.
- HIGH PERFORMANCE TASK SPECIFIC WORK GLOVE - The number one selling Ironclad work glove
- HAND SAFETY - Thermoplastic rubber knuckle protection provides impact and abrasion protection across the knuckles
- SECURE FIT - Adjustable Hook and Loop Closure provides a secure custom fit for ideal performance
- SWEAT MANAGEMENT FEATURE - Terry cloth sweat wipe conveniently located on the back of the thumb allows you to stay focused on the job at hand with one wipe of the brow
- MACHINE WASHABLE - Machine wash cool. Air drying is recommended in order to keep the size consistent with its original form from time of purchase
How to Use an Orbital Sander on Cabinets
Now that you’ve gathered your protective equipment, tools, and materials, we can begin sanding. Just follow these steps:
- Start by taking apart your cabinet to make it easier to sand down every nook and cranny. Take the doors off the hinges, then unscrew the hinges and any knobs or handles.
- You might find it useful to draw a diagram of your cabinet’s configuration to help you remember where every piece goes. You can number each hinge, knob, and door and write the number both on your diagram and in a hidden place on the piece itself. Taking photos of the process with your phone can help you remember the configuration even better.
- Remove the previous finish or paint. If the cabinet is covered in an oil-based coating or paint, rub on a coat of paint stripper, wait till it clumps, then use your putty knife to peel off the clumps. Some finishes soak deep into the wood; it’s better to just sand those off. If your cabinet is unfinished, use your degreaser to wipe down the surface and get rid of any accumulated residue.
- If there are any dents, knots, or pores on the surface, fill them with your wood grain filler or wood putty before sanding.
- Now, let’s start sanding. If you need to remove a coat of paint, begin with your 100- or 120-grit sandpaper. If not, start with your 180 for most jobs. If you’re sanding down a new cabinet fresh from the factory, you can even start with a finer grit like 220.
- Move your orbital sander using even strokes and a smooth motion. It’s easiest to follow the grain of wood whenever you can. Keep the orbital sander moving continually to avoid marking the surface or digging a sander-shaped dent in the wood.
- Pause every so often to tap the accumulating dust off the sander. If sawdust begins to pile up, use your dust vacuum to remove it.
- If you want to do a final round by hand to get an impeccable surface, use the 220 sandpaper. A final round of hand sanding can help you reach all the little crevices and cracks.
- Before moving on to the finish, take a minute to tidy up. You don’t want any particles stuck in your varnish or paint, so use a brush to loosen any sawdust left on the cabinet, and then vacuum it up. Give every surface a final once-over with your tack cloth, and you’ll be ready to start finishing.
- Use your brush or roller to apply your favorite finish to the cabinet. If you want to paint the cabinet, begin by applying a primer, and then do a lightning round of hand sanding before applying the paint. Use the 220 sandpaper for this part, and make sure you file down any accumulated primer along the edges or inside the grooves.
- Let the finish dry before you start putting the cabinet back together. Once the surface no longer feels sticky, begin the reassembly. Use your numbered diagram or photos to put the cabinet back together in the exact reverse order of your disassembly process.
Enjoy your freshly sanded and finished cabinet!